Frequently Asked Questions
Please checkout these FAQs before posting your question to the discord
What is CSVP?
CSVP is an Immersive, Vanilla Focused modlist built upon the visuals in “Next Generation Visual Overhaul”. It is intended as a packaged experience you can play immediately after download, but is sparing enough in sweeping overhauls to allow customization.
Skyrim Anniversary Edition with the full $20 upgrade is required. CSVP runs on version 1.6.1170.
How is it different from NGVO?
NGVO is a high-end ‘visual baseline’ meaning it focuses on graphics and was designed to be built upon. CSVP adds hundreds of gameplay mods to enrich the experience and bring my vision for Skyrim to fruition.
CSVP is about taking your time
With changes in place to stretch out questlines, fast travel limited in an immersive way, and a chance to trip on rugs when moving haphazardly, everything about this list asks you to slow down.
The game defaults to a custom scaled Master difficulty with Survival Mode ON, but this is not a hardcore list. Hunger/Warmth/Rest are all present but toned down, simply providing excuses to relax at an Inn or spend the night at home with the kids. Fast Travel is limited but the trade-off is exploration levels your character, and improvements to Carriages/Horseback/Ferries/even the landscape itself work together to make Skyrim the most explorable it’s ever been. Combat starts hard but incentivizes preparation & rewards skill expression, eventually building into a late game power fantasy, and the custom level curve ensures things don’t stagnate as a playthrough goes on. All settings are configurable with know-how but this list focuses on my singular vision.
CSVP is intended to be used with the Vanilla Cart Opening but it is optional, should you choose to skip the intro you will start at the end of the Helgen cave, and a chest with starter items will be outside under a tree to your right.
I have added no custom followers, no new lands, and no sweeping changes to systems like Combat and World Scaling (AKA No Requiem, no MCO, etc). I opted to enhance what was present already and keep Skyrim feeling like Skyrim!
The list is built on AE Edition but I cut out or modified a lot of the content that AE includes, either for Lore reasons or personal taste. Disabled AE Content Includes:
- Sunder & Wraithguard
- Umbra
- Staff of Sheogorath
- Divine Crusader
- Arms of Chaos
- Bow of Shadows
- Plague of the Dead
- Dawnfang & Duskfang
- Saturalia
- Shadowfoot Sanctum
- Bloodchill Manor
- Hendraheim
- Civil War Champions (You just get the Armor in the Civil War Questline now)
How can I download it?
CSVP comes in two versions: Main and Performance
To download CSVP, select a version from the ‘Main Files’ section of my Nexus Downloads tab. That is the Wabbajack File and the only thing you personally need to download from the Nexus Page (If you are downloading the Main version off of Wabbajack itself, you can ignore this). From there you want to open Wabbajack and do the following:
Go to ‘Browse Lists’, select ‘Install from Disk’ in the top right, Select the CSVP Wabbajack file you downloaded from Nexus, Set the installation folder to be somewhere like C:\CSVP. Do not install it to your desktop, downloads folder, or program files folders, The download location does not have to be an SSD but it makes the install faster. The Download and Installation locations also do not have to be the same if you have storage concerns, See the ReadMe for Pre Installation Steps and further instruction,
The two versions are completely identical gameplay and backend systems-wise. The difference is strictly visual and performance focused; CSVP Main can use up to 10.5GB of VRAM in the most taxing areas, Performance uses downscaling and a different combo of flora mods to limit that to 7.5. As of Update 2.1 Performance is also on ENB, and FrameGen is an included Optional for BOTH versions of CSVP and still OFF by default so users can experiment for themselves post install!
How do I enable Gamepad?
Switching to the controller config is 3 easy steps (See the video). Bind Dual Wield Block to L1 in Valhalla’s MCM and activate the ‘Controller Config (ON)’ profile in the MCM Recorder Menu, then Open & Close moreHUD’s MCM, that’s it! To switch back from controller you will bind Dual Wield Block back to V, and activate the ‘Controller Config (OFF)’ profile.
See the bind maps below. Hotkeys 1-6 need to be set by the Keyboard as they are mapped but not able to be designated by the Gamepad itself.
Reminder that with STB Hotkey Quick Cast you can swap between Powers and Shouts on the fly without going into menus by binding them to a hotkey! 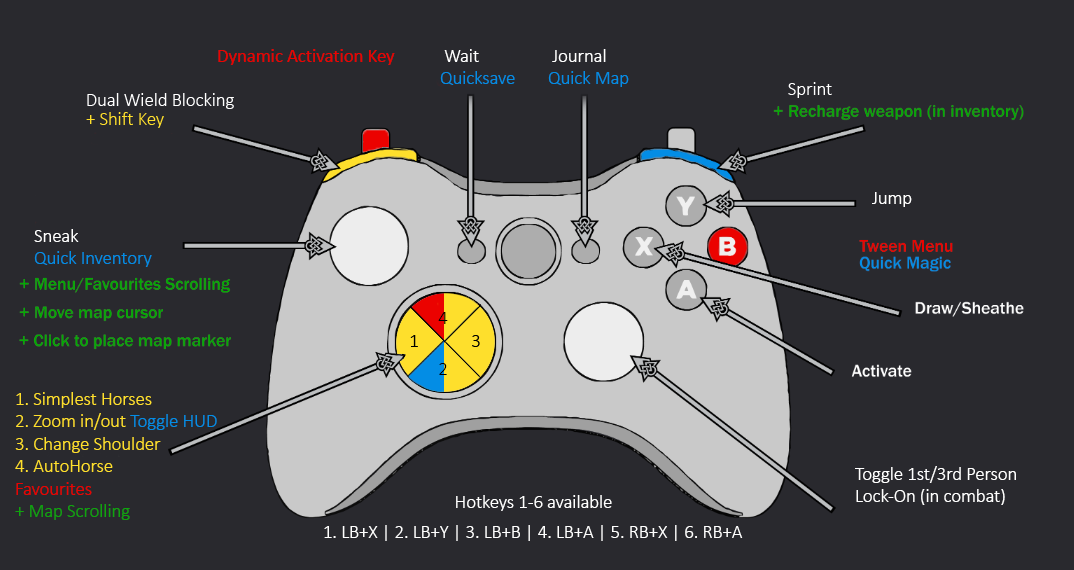
Where is my HUD?
CSVP has the mods ‘iHUD’, ‘A Matter of Time’, and ‘moreHUD’, all bound to the X Key by default. This means nearly all UI elements will be hidden unless holding X, and the crosshair will only appear when sneaking or using ranged weaponry/magic. If you do not like this simply set the three listed mods to ‘Always Active’ in their respective MCMs, and you will still have the N key to fully toggle the HUD on/off if you choose!
What are the hotkeys in this list?
- ENB: SHIFT+ENTER
- Community Shaders: END
- KreatE: HOME
- Open Animation Replacer: SHIFT+O
- Immersive Equipment Displays: BACKSPACE
- Improved Camera SE: SHIFT+HOME
- SmoothCam Toggle: UP ARROW
- Switch Shoulders (SmoothCam): M4 (Mouse Side Button)
- Third Person Zoom In/Out: M5 (Mouse Side Button)
- Simplest Horses: H
- iHUD/moreHUD: X
- Toggle HUD: N
- Dual Wield Blocking: V
- AutoHorse: B
- Teleport Followers to You: G
- Photo Mode: \
- Object Manipulation Overhaul: ‘
- Hotkey Reminder: F11